
- ⁄
- Travel News
- ⁄
- Photos
Don't make my mistakes.
We’re currently rolling through a period of high solar activity, which means more opportunities to photograph the northern lights (a.k.a. the aurora borealis) as they shine brighter, more frequently, and more widely than usual. But if you’ve ever tried to photograph anything at night, you know there’s a learning curve attached—especially when your subject is a literal will-o’-wisp in space.
As a long-time Alaskan, I’ve spent many hours making all the mistakes, so you don’t have to. I’ve also interviewed professional aurora hunters, piecing together their advice to figure out where I’d gone wrong—and how to put things right again. The end result is this collection of what not to do when photographing the northern lights. As long as you’re not doing these things, you’re probably on the right track.
Top Picks for You


Don't Be Around Light Pollution
If you are in a city or town, there’s always light around you—even in the dark of night. Although extraordinarily bright displays of the northern lights might still be bright enough to see in all that ambient light, they end up as a pale, washed-out echo of their true selves.
The Fix: Get out of the city! Or if you don’t do that, find the darkest sky possible. That doesn’t just make the aurora look brighter, it also becomes much easier to photograph. I’ve improved my odds of seeing the northern lights by driving to streets with no street lights, unlighted parks, and remote trailheads and campgrounds.
Don’t Let Your Tripod Break in the Cold
You’ll only see the aurora borealis when the skies are dark, which, since we’re talking about northern locations, also means cold. For example, Alaska’s undisputed aurora-viewing capital, Fairbanks, regularly sees winter temperatures of -20º to -40º Fahrenheit.
And you know what happens at those temperatures? Stuff breaks. Including your tripod, arguably the most essential piece of gear needed to produce clear, steady photos of the northern lights. That’s how I ended up with one of the most miserable photos of one of the most spectacular aurora displays I’ve seen in my life.
The Fix: Don’t try and muscle the adjustments on a frozen tripod like I did. If you need to make adjustments and it’s not moving easily, take the tripod inside and let it warm up first. Using a heavy-duty tripod also reduces the risk of breakage.
Recommended Fodor’s Video
Don’t Forget About Your Own Light Pollution
The aurora is best stalked in the deepest, darkest night skies you can find, but you’ll need some light for doing mundane things like adjusting your camera settings, and finding that one glove you keep dropping. But if you leave the light on while you take photos, bad things happen—like the obnoxious glow of a headlamp, as is the case in one of my photos.
The Fix: Just use a headlamp with a red-light mode, as it’s less likely to ruin your night vision and that of anybody around you. And turn it off when you’re taking pictures.
If you’re in a car, the ideal aurora-mobile has headlights and running lights you can turn off, and interior lights that won’t turn on automatically when you do things like turn the car off, open the car door, or shift into park. Check your settings.
Don't Smoke or Breath Fog in Your Photos
Speaking of aurora-viewing and cars, if you drive to your photography site, it’s probably tempting to leave the car running as a source of heat. Don’t do it! The exhaust from the tailpipe forms a cloud in cold air that is guaranteed to waft into your photos or those of someone nearby and ruin them.
The Fix: Wearing a buff, neck gaiter, or similar item over your mouth and nose will help keep the plumes of your breath from creeping into your photos—but you can’t do that with a car, so either park it far enough away that the exhaust doesn’t interfere with anyone’s photos, or leave it off. And for heaven’s sake, double-check that your running lights and interior lights are off!
Don’t Forget to Use Shutter Release
Remember how important a tripod is for aurora photography? That’s because when you’re dealing with dark subjects and long-ish exposure times, even the slightest jiggle of your camera will distort the photo.
And you know what can always be counted upon to jiggle the camera? Your finger on the shutter release. No matter how gently you touch the button, that click produces enough movement to fuzz up the delicate focus of a night image.
The Fix: Use a remote shutter release if possible. If your camera (or phone) isn’t compatible with a shutter release, or you don’t have one, use a shutter delay instead.
Carry Spare Batteries—but Don’t Let Them Freeze
Cold air saps the heat right out of you and your camera batteries. If you’ve done enough research to know that and bring extra camera batteries, you’re ahead of the game—until you leave those batteries in your jacket’s outside pocket or your camera bag, and they freeze anyway.
The Fix: Pre-frozen batteries won’t do you any good. Either keep them in a warmer location (like a heated building or car) or keep them in your inside pocket so that your body heat helps keep them warm. The same goes for headlamp batteries, your smartphone, and any other electronics you’re carrying.
Don’t Forget a Plastic Bag When Taking Your Camera Inside
If you’re on an aurora-viewing tour or have a smart, strategic setup of your own, you’ll probably have access to some sort of warm building or vehicle where you can relax in relative comfort while waiting for the aurora to come out. Remember that the aurora shines on its own schedule—it comes and goes just like the wind.
It’s tempting to take your camera inside with you, but any glasses-wearer who’s ever walked into a warm building from the cold can tell you exactly what that does to the glass in your camera, including your lens: It fogs right up. Bye-bye, clear pictures, hello photos of glowing space fog.
The Fix: Strangely, putting a plastic bag around your camera before taking it inside keeps this from happening. Or just pull the battery out of your camera and take that inside, but leave the body and lens outside where they won’t fog up.
Don’t Forget the Camera Manual
Once upon a time, I took a week-long aurora-hunting trip with a new camera in tow. I threw the camera manual in my bag because, of course, I was going to it to figure out how to adjust the critical functions of ISO, aperture, and shutter speed—the three factors you balance to get a clear photo of the northern lights.
And, of course, I didn’t follow through until aurora-hunting time had arrived. Luckily for me, the lights didn’t come out that night, or I would’ve been caught with my proverbial photographic pants down. Please enjoy this photo of the warming yurt at the beautiful Taste of Alaska Lodge, because that’s the closest I got to the aurora that night.
The Fix: Read the manual before you go! Or, if you’re using a smartphone, sort out how to adjust its settings before you set up for photos.
Don't Take Photos Directly up at the Sky
There’s nothing wrong with a (literal) straight-up photograph of the aurora. Really, there’s not. But let’s be honest—without a foreground subject or at least a horizon line to lend perspective, most sky-only photos become nothing but a colorful smear.
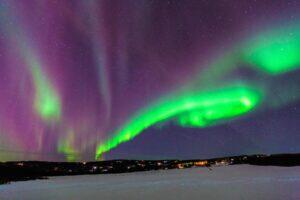
The Fix: Try including a tree, a building, a person, or even a vehicle—anything handy in the foreground—to add drama and perspective. This requires getting your lens focused at the right distance, which can be tricky to do in the dark. If you know where you’ll be shooting, you can game the system by showing up early, setting the camera to focus at the correct range, and then taping down the focus ring on the lens to keep it there. (Make sure the lens is in manual mode.)
Don't Dress Wrong
There’s no way around it: Unless you’re phenomenally lucky to see the aurora at relatively low latitudes, aurora-hunting means being out in the cold and dark. It also means a lot of standing around and waiting, and guess what? The amount of clothing you might wear in those temperatures for an active pursuit, like hiking, isn’t going to be enough to keep you warm when you’re standing still. And if you get too cold, you won’t be taking photos.
The Fix: Put on heavier layers. If I know I’m going to be in one place for a while, I like to bring a camp chair, a blanket or sleeping bag, and a hot drink to help me stay even more comfortable. Even a scrap of closed-cell foam to sit on is a lot more comfortable than standing around in the cold.
Don't Forget to Practice First
There’s no escaping the trial-and-error curve with aurora photography. Your first photos will never be your best. But even if you live in a place where seeing the northern lights is a once-in-a-lifetime marvel, you can still make yourself ready and zoom through that learning curve in advance by practicing night photography.
No matter what you’re photographing, it’s still a delicate balancing act of ISO, aperture, and shutter speed—and you can practice that with any subject in the dark, from campfires to ice sculptures and buildings. And who knows? Those very specific skills might come in handy.
The Fix: Get to know your equipment and which settings which best in what conditions.
Don’t Depend Completely on Aurora Forecast Apps
The aurora doesn’t shine every night, and when it does come out, it’s not there constantly. It waxes and wanes, forming an arc across the sky in one moment, then a dancing ribbon or maybe spearing towers of light. Then it’s gone.
Mobile apps like Amazing Aurora and Aurora Alerts can alert you when aurora forecasts are favorable in your area. If you’re lucky, you might even have a geophysical institute nearby that produces space forecasts or sky-facing webcams you can view to see when the lights come out. But webcams don’t always update correctly, and the forecasts aren’t always right.
The Fix: Go outside and look up. You never know what you might see. Even if the northern lights aren’t out, there’s always something beautiful to see in the night sky.